home

Sunday, 29 May 2016

Mixed Media Place- You were meant to SHINE

On now at Mixed Media Place is this FAB mood board


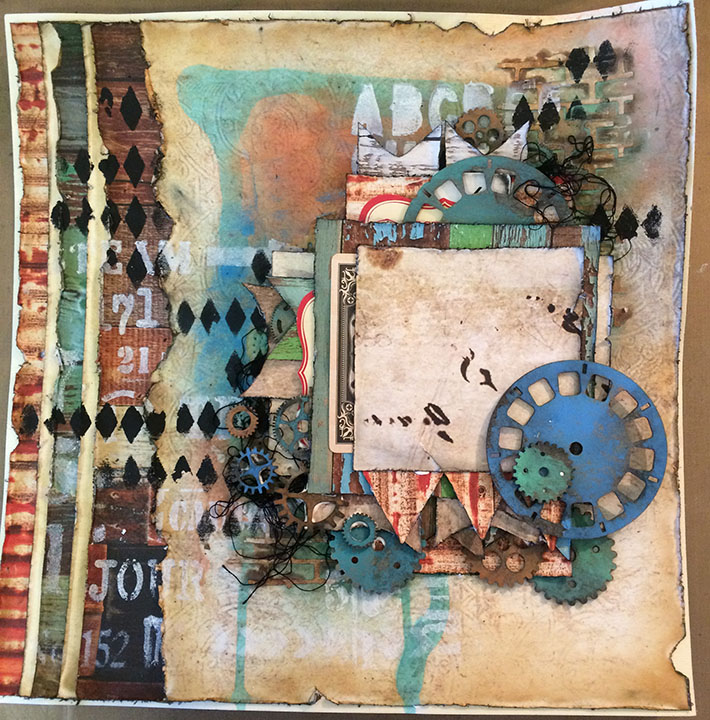
And here is my take:
This page uses some new designs i have been working on, very vintage and decorative.  I have added them to my etsy store
Bumble Bees
Chicken Wire Texture
Lace Edges
Carte Postale

The other thing I have been playing with is cutting banners, plaques, texture etc.. with my silhouette for layering. Loving these for layering unfortunately all that cutting kills my cutter blade.  Oh well the effect is worth it. Then i have found some FAB vintage ephemera from etsy that i can print at home.  Love the final effect vintage, grungy shabby chic.


I started with cutting 12x12 paper down to 12x6 and sewing the two half together, i also added tape along the seam on the back for extra strength.  I mixed rust mica powder to modelling paste and applied through a stencil.  I used Carte Postale from crafter's workshop 12x12 stencil.
Next (once dry or at least partial dry I dont have the patience to let things dry) added some color to textured areas with Lindy's Delphinium Turquoise, tiffany blue, and gecko green.  Also used prima color bloom tea stain and worn leather.


This is my favorite part, I made sure i didn't cover up this part.


My layering elements, some cut with silhouette and some printed ephemera.  Distress and ink edges


This is my favorite texture- circle mesh.  Takes forever to cut and the noise drives my family crazy but it is worth it.
I cut up all my texture paper and chipboard, its a waste to leave them whole since you wont see it under all the layering.  I dont have to cut as much and i can tuck into several spots so the cluster can look fuller.


layering cluster, once all the elements are in the cluster you don't see everything but thats how the nice full cluster happens.


Next i grunged up the chipboard.  I added some mini stones to modelling paste, and some plain modelling paste and applied to the chipboard. Spray with worn leather, then added some more color with alchemy sepia and opal rose gold. Did this to all the chipboard pieces.  Final look is fun, i will be doing that again.


Final cluster, my favorite part is the texture pieces chipboard and paper.  I love that you can see through the bits and they cast shadows.  When i layer together i don't glue the entire piece down just added a small amount of glue to the center or along edge, this way things kind of curve at edges and have a little movement.  Not so flat, I guess i could use pop dots but i like glue.  Usual my pages or albums are for kits and get man handled a lot, glue holds better.


Finally i splattered everywhere with white acrylic paint that i diluted with water first.


Followers: 41
Thats two more ladies Thank you for you support of this blog.

Now i am off to make bread.  Happy Sunday.

Sunday, 15 May 2016

Glam Grunge

This was the perfect challenge for me Grunge and glam check it out at Mixed Media Love  LOVE grunge, LOVE shiny glimmer shimmer.  Here is my take.  Super happy with it

So many things i am loving, tissue paper, chipboard, rust paste, copper micro beads, distress embossing
powder, alchemy paints, industrial stencil, and harlequin texture.


I started by covering mixed media paper with pattern paper, ripped up some tissue paper, ephemera card and adhered with gel medium.  Next i swiped on some gesso with a palette knife.  I allowed it to dry a little then wiped off some. I sewed around the outside.


Roughed up the edges with a distressing tool and distress ink.  Added some washi tape in the top right and bottom left corners.  Added color and shimmer with Prima Blooms, turquoise and blue. Dry


I took some Lindy's gold spray and flicked it on top of the blue shimmer spray.  Dry.
Added some great industrial numbers and arrows with a stencil, applied the black paint with a sponge.  I used the paint like a versa mark and sprinkled on distress embossing powder- black.


Added some texture with a harlequin stencil,  I mixed alchemy blue/gold opal paint with modeling paste.  The paint lost some of shimmer when i mixed with modeling paste so I painted over the harlequin with the alchemy paint.  Added some copper micro beads mixed with gel medium and randomly applied around harlequin texture.


Next i added a bunch of chipboard gears then painted them walnut distress paint.  Next rust up those gears with rust paste by Prima LOVE this stuff, dries matt and is super gritty.


Final touches were to paint honeycomb chipboard with black distress paint.  I bunched up a hand full of cream thread and layered between cogs and chicken wire.


 I painted the singing the rain man with white acrylic paint, stamped with black ink and several textural stamps.  Grunged it more with art deco antiquing cream.  Finished with some banners.

Enjoy!


Wednesday, 11 May 2016

A few of my favorite things

This one is a kit I designed, and i used a few of my favorite things. Chipboard gears, harlequin texture, alphabet and industrial- ish stencils.

I layered pattern paper and cardstock together, I am really loving layering of late.  Here is my favorite part the color sprays with textures created with white and black acrylic paint with stencils. I love alpha stencil with an urban grunge edge.  I am working on a line of urban grunge chipboard and stencils it is all very cool in my head just need to get it out of head and make it reality.


Now more layering and layering.  Pattern paper panels with banners, ephemera and thread.  Love the layering but its always a catch 22, the layer cluster always covers the FAB background.


Now the chipboard and gears.  I painted the gears with distress paint, allow it to dry then sand and ink with distress ink.  The distress ink settles into the sanded areas but can wipe off the paint.  It gives it a very distress old look.

Follower Count -39
Thank you ladies keep on following.

Sunday, 1 May 2016

Downton Abbey

I am a fan of Downton Abbey, a portrait of days long gone.  If you are looking to for something to watch that doesn't have violence, sex or swearing this is the show for you.  PLUS the costumes are AMAZING.  I love history I am been watching historical documentaries lately my head is full of useless facts, love it.

My friend Leslie created my encyclopedia album but used all Downton abbey pictures in it and i thought i am going to do that!  Here is my new album kit soon to be available at Treasured Memories as soon as i write the instructions lol.  I hate instructions.  This album uses all new chipboard designs- very decorative and frilly (outside of my usually wheel house).  Then i took some chipboard designs, plus some new items and cut them out of old paper with my silhouette.  So banners, background texture, filmstrip so many fun accents that worked FAB for layering and more layering.  did i mention the sewing, my sewing machine got a work out.  Have a peek...


Tuesday, 12 April 2016

Rusty Plumbing

I have been working on some new kits to take to Treasured Memories for National Scrapbook Day. Kits are great for earning me some extra cash (to of course buy new scrapbook materials) and uses up some of my stash.  You know so i can add to the stash again.  I am really happy with this one, so many things worked.

First i like the sewing, i actually pulled out the sewing machine instead of being lazy and just doodling the stitching.  The other part i love is the paper layering on the left of the background, enhanced by that wonderful sewing.
 I created the piping with chipboard, then added mini stones with gel medium to look rusty and eroded.

The patina color is achieved with layers and layers of paint. First paint all the piping and grout with brown.  Next highlight with red, orange, blue, alchemy blue gold, black and finally white.  All the highlight colors are lightly brushed onto piping and grout building the color to achieve that rust, patina color.

This took me a couple tries, and a night of sleeping on it or I would have throw the page out.  Yep i was that frustrated.


This is a fun top corner, here i used the piping as horizon line to add a cluster above.  Add some texture with ink and stencil, lindy's spray and finished with random washi tape and rub ons.
This the bottom corner, i like the rip out with the tag poking out, then the faucet.  Here is harlequin stencil again and lindy's spray.  Now this corner is why washi tape was added to the layout, i had some paint spots and HATED them so i had to figure out how to cover.  Luckily it worked.


I am loving layering paper, paint, texture etc... on to the next one

Followers:36
Lets go for 40 at the end of April!

Thursday, 31 March 2016

It's been a WEEK

As usual i left everything to the last minute, i do work better under pressure mostly.  But then in a 24 hour period my computer and phone crashed- dead, gone, nothing.  Luckily i was able to get my files off my crashed laptop.  But the phone was dead and i couldn't transfer the data so i wrote down all the phones numbers again i was luckily i had just transferred my pictures so i didn't loss any of those. PANIC set in.  Now i am back up and running and playing catch up.

Here are the final three page kits that will be available this weekend at the Crop Haven crop here in Cold Lake.

I like the black outline with the shadow around the color drips it looks like graffiti. I want to try this on an art journal page this weekend.
Here i used flowers- Honestly not sure how i feel about this one really not sure if i like it.  What i do like is the ripped out sections of the background with the clusters tucked- i see a art journal page in future.
Final page kit again not sure i like, what i do like is the rust paste.  Right now this is my new favorite product I recommend it to anyone.  It gritty and dries matt- FABULOUS.

Followers- 36 and growing

Looking forward to this weekend stay tune for some art journal pages.  Working on a new kit that combines art journalling with pocket pages. I know what i want to do just haven't figured out all the details.  Right, going to write out my thoughts maybe it will help me focus.  I want to have vintage sketches of nature- birds, trees, nests etc..  I want to use my water color pencils.  What i haven't figured out is how to make it into a kit?????

Sunday, 20 March 2016

Page Kit 3

I really like this one!!!  I used some of my new products, art alchemy metallique paint- light patina, rust effect paste- brown rust, red rust, micro beads- copper and rub ons foil- copper.

no play by play since it will be a kit. I just bought the rust paste and i have to say i LOVE it.  Its really grainy and dries matt  FABULOUS!


Here is a close up the rust paste, I also rubbed the foil on top which works GREAT, The foil sticks to the raised texture another layer of detail.


I doodled on the stitching with a black pen, basically because i was too lazy to pull out my sewing machine.  Also doodled on circle with dots.  Another layer of detail.


Here you can see the micro beads, those were just added onto embellishments with gel medium.


Followers -34

Stay tune i finished page kit 4 I will post in a couple of days.