home

Saturday 4 December 2021

Moonlight Tours


Moonlight Tours Steampunk Airship FINISHED!!

The Steampunk Engine is made with chipboard and the moon is made with a paper lantern with paper mache on top for sturdiness.

I used Mod Podge Dimensional Magic for the inside of the windows, gives it a great glass look.  I really wanted a curved roof but can be challenging with chipboard so I decided to use house styrofoam.  I cut the shape i wanted with a exacto knife then sanded with fine fine sandpaper.


The railings are made with 3 sheets of chipboard
glued together- this is the first time i tried this and it worked fantastic.  I also did this with the paddles.


The large gears are made with fun foam you can get a the dollar store.  I love when things move, so the gears and paddles actually turn.


I sealed all the chipboard with watered down glue, really holds everything together and helps make it water proof.  I painted with brown acrylic paint, and aged with watered down acrylic paint that i brush on then wipe off the excess.


Here it is all lit up, it didn't work like i had wanted. I wanted more of a glow all over the moon but I struggled with paint color and painted it many many times.  But I know what needs to be done in the future so i will try this again.

FOR SALE $450+shipping
Approx size 18"x36"
Includes ceiling light.

Saturday 24 July 2021

Christmas Vacation RV

Hello all, this project is came together super quick and I love the final result.  Eddie's RV from Christmas Vacation- A Christmas Classic.  The project isn't complete, next I will make Christmas Cards, the RV can be used each year to hold the Christmas cards you receive.

I made the RV with chipboard (my usual substrate) then add details with more chipboard, paint, dimensional magic and lights.  I love love the final result.


It really is amazing what layering chipboard and paint can create.

The wreath is made with garland pipe cleaner.


One of my favorite details is the dirty windows.


Used texture paste to create the rust and give it some dimension.


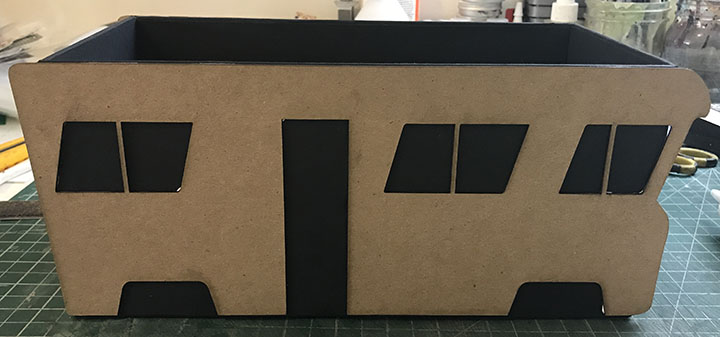
It all started with a box! I designed the RV sides and cut them with a laser engraver.  Glue the sides on the box, then shape chipboard on the front and back.


By scoring you can shape chipboard around curves and give it shape.  To hide the score marks I covered with white cardstock- make sure the paper is glued on the entire surface otherwise when you paint it bubbles appear where it isn't glued down.


Add the details- window frames, door, vents, and molding.  Once the whole RV was assembled i painted entire piece with watered down glue.  This seals everything especially the parts covered with paper, now it is ready for paint.


Next add paint, I started with white, then added blue, finally paint frames and vents with silver.


Now the fun part! Add rust.  I tinted some texture paint (raw sierra) and used a sturdy brush to apply.  I added texture around wheel wells, molding, basically where joints are located.  I also feathered out the color from the texture spots.  I used Modge Podge dimensional magic to fill in windows, when it dries it looks glass like.
To make the dirty windows, i cut ovals out of cardstock and taped onto windows.  Then I mixed a light brown paint color, and used a makeup sponge to apply to windows.  The key is have paint blended into the sponge no paint globs.


I finished the rust by adding more color, red oxide and dark brown.  The color is added in the textured areas then I spray with water to remove any paint edges. This gives the rust more life like appearance and depth.  Next add dirt on RV body, used the light brown and sponge for this too. The final touch is add mini lights and wreath.

Some close ups.


Monday 21 June 2021

Folio Junk Journal

 I really love the Tim Holtz folios, I used the hinge to make 4 individual folios and glued them together to make a junk journal.  I used some my favorite funky chipboard designs and AB studio paper pack "In the Past", "Love for Old Things" along with a floral paper cut outs.

I used file folders to make the folios, once they were all glued together made a closure flap with elastic strap.


Open folios.


AB Studios paper pack come with great cutting elements, tags, frame, poloraid cards and sayings.  Makes them great to use for a junk journal, lots of varies shapes and sizes for added interest. I used old photos i purchased off etsy since i find it easier to scrapbook with photos since i like to layer on top.

I went through my stash and used up a bunch of odds and ends.  I had canvas sticker letter, chipboard letter, and metal bits these were used for accents.

New chipboard design- chess pieces


I used my pipe chipboard to make pipe cluster around photos and sayings.  Love how these turned out.


I like how with the folio hinge you can see the layers underneath,  you do need to be aware of the front and back since you can see both.  Luckily most of the papers were double sided.

This is one of my favorite chipboard designs, the bone frame of ribs, spine then behind the organs and major blood vessels.  The floral paper cut outs behind really add to the final look.


Here is a couple other chipboard designs I love - dressframe with lungs and Bowler and Apple (Portrait "Son of a Man")

I also found the key to the folios is to start with smaller pages/clusters and work your way up to larger pages/clusters


This will be a kit sold at Treasured Memories in Edmonton- should be in store at the beginning of July.


Sunday 23 May 2021

Rusty Bird House

Treasured Memories asked me to come up with a kit for Finnabair Rusty bird House,

So continuing with my fascination with tiny houses here is my take.


I made a turret on top, complete with window, flat roof and rounded shakers.  I recently re-discovered my bendy straws so I added a steampunk edge with piping and gears.
The cut outs are Mintay paper elements, fuzzy cut and inked.


I kept two sides simple (because i love simple) then two sides busy for those that believe more is better.  This is also my favorite blue- Tiffany blue as i like to call it.

The straws are painted with black gesso, then Art Academy metallic Steampunk Copper.  You can still scrape off the paint but unless you make a effort to remove paint you will good.


Layer on the gears and cut outs to make clusters on two sides.  I used the smaller gears to hold pipes in place,  this needed to dry overnight.


The Close Ups- Happy Victoria Long Weekend!  Enjoy the sunshine (finally we had snow this week)

Chipboard is available on the etsy store

Sunday 9 May 2021

Wizard Way

Completed a new book nook, i am obessed with tiny houses and window shops.  The buildings are a take on Harry Potters Diagon alley- funky, curved windows with a magical flare.  It is really hard to take pictures and see all the details and i of course forgot to take pics before i glued all together.

I didn't make a brick background instead made a textured wall using thin foam sheets (from the dollar store) to hide wires.  Next I smeared on modeling paste to give texture and paint with highlights and lowlights to showcase texture.


I made the left building curve around the corner, absolutely love how this looks.  The building didn't lay flat against the wall so i added the pipe detail, which i love.  Here i just used a straw, painted with black gesso, then metallic brass and antiqued with brown.  I put piping on all three walls.


Added a little bird and nest on building roof.  I made 4 different types of windows to add around buildings.  My favorite are the round ones.  Painted them all colorfully.


More piping and tiny windows.  Some of the windows have shingles like the building peaks.  I painted shingles with a green hue to have them look old and mossy.  The straws i use have an extra long bendy section which are fantastic to shape around windows.


The signs are made with 0.25" MDF on a laser engraver then i hand painted- not my smartest idea.  But they look amazing and fit the whole theme.


Made a bracket out of 0.25" MDF put a bird in a dome and hung off building.  I painted the foam bird to look like an white owl, this detail just adds some charm.  Also made a broom with twig and twine, glued into apothecary with a plastic skull purchased at halloween.  


This Wizard Way street sign is one of favorite details, again a pain to paint but love the look.

Working on York Shambles street next.


You can purchase this piece at my Etsy Store Boozybear


Thursday 22 April 2021

Circus Canvas Art

 This project is 3 months in the making, I have been working on it off and on since Christmas and have finally finished.  I started really strong, build the ship right away make the circus tents but then I slowed...  The painting needed to be completed in several stages to allow for drying time, figuring out construction of sails etc...  Finally I stopped procrastinating and got it done.  And the final product

Canvas Size 24"x36"
The ship sticks out approx 6" from the canvas.
I added texture with light modeling paste and painted the canvas with acrylic paint.

Lots of layers of paint.

The circus tents are made with thin chipboard, cut, bend and shape into tents.  I wanted the tents to have a fabric look so I covered them with light modeling paste to add texture.  Paint the tents.

To highlight the texture on the tents, painted with watered down brown paint allow to dry slightly then wipe off the excess.  The brown settles into the grooves, nooks and crannies.  Finally dry brush with white paint, the white hits the high edges and highlights the texture.  You now have highlights and shadows.


Love this photo, the shadow the tents and string make on sails.

All tent bases are made with large chipboard gears.  The chipboard gears have two purposes, they look fun!  And the center holes are the same size as the wood dowels so the act as the anchor on masses top and bottom.

Same goes for the gears on the top of tents.  The center holes are the same size as the small wood dowel (flag poles) and used to anchor flags to the tents.


Sails are made from thin foam sheets you can buy at the dollar store, cut to shape then covered with light modeling paste also to give a fabric look.

This part was challenging, positioning the masses just right so there isn't too big of a gap between masses and canvas.  


I wanted the ship to look like it was flying away so it is build with a 6" depth at the back and flat at the front.  This helps when constructing ship because you can see the construction so it doesn't need to look pretty.

I think my favorite part is the rope from sails to railing, creating fun shadows, and that final finishing touch.

This piece is FOR SALE on my etsy store


Used this reference photo from Eve Skylar, loved the tents.  Also used this video from Creative mom to make the ship, my pattern didn't work as good but i made it work.