home

Tuesday 29 November 2016

Rustic Glam

This month's challenge at Anything But Cute is


Here is my take, I haven't decided if i love or hate this layout. Somethings make me smile, somethings make me cringe. I think i don't like how busy it is.
But like i told my friend Jen once, not every page needs to be a masterpiece.


I started with putting washi tape onto background page.  Glue some chicken wire chipboard on top.  On top of that embroidery thread, this i just let fall, then glued where it landed.


Painted the cluster with white gesso,
while the gesso was still damp i painted on Lindy's Buccaneer Bay Blue. I also spray some water onto page to help with blending and to get the color to move around easier. Next I splattered on Crow's Nest Copper.  Since everything is wet it blends nicely.


Here is how it looks when the color are still wet.


Here is how it looks when it dries.


Next i splattered with white and gold acrylic paint.  I like to water the paints down first i find it will splatter easier.


Layer together paper blocks, they are distressed and inked.  Layer Chandelier Frame- painted gold.


Layered everything together and tuck cardstock texture pieces between layers.


Now for the close ups, I always love how these look, you get to see all the little tiny details.


Saturday 26 November 2016

Winter Sun Beam

Today i took inspiration from 13 Arts November Mood Board

Looks very frosty.


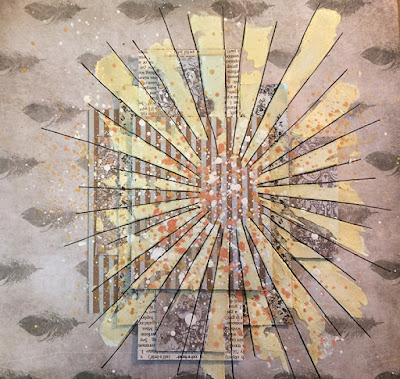
Here is my take, I wanted it look like a sunburst reflecting off the snow. Then i came up with an idea to apply the starburst onto all layers, then take layers apart distress and ink, add texture and put it all back together again.  The starburst is still there but not as stark.


I layered together all the paper block, and held with washi tape on the back.  Mix white acrylic paint with modeling paste, I like to mix with white acrylic so its white white.  Apply through a starburst stencil.  Dry


Next lightly paint starburst with a metallic champagne color.  Water down white acrylic paint and splatter onto page next gold paint.  I mixed Memory Hardware Artisan Powder Antoinette pink with water and splatter onto page.  Dry


Outline the starburst with black marker.


Here i have taken everything apart. I distress and ink paper block.


Here i have started to put everything back together.


Here it is all together again plus i have added banner and edges that have been distressed and inked.


I added some pre cut texture bits between layers.  Again i mixed Antoinette Pink Artisan Powder with water and painted the texture.
You can see how the banners and texture bits break up the starburst but the starburst is still visible.


I layered together Birch Trees and Rickety Fence.  I used stampendous gold embossing enamel on the fence, heat set.  Then i painted the whole cluster with alchemy paint- metallic copper, opal rose.  Added the "snow", white acrylic paint.


Some close ups of all the layers and texture.  Look at all the dimension.  Now i am off to cool my hand off with ice, I grabbed a pan that was in the oven without a towel.  What the hell was i thinking. I managed to do a real number on my hand, hopefully tomorrow it feels better.  I wanted to work on another page tonight but the hand wins.


Here is a picture of my dog Finn- how can this be comfortable. LOL

Sunday 20 November 2016

Mixed Media continues on

I have finished more pages for my fortune teller mixed media album i am creating.  I am loving this album creating it has been really fun and challenging.  I want the pages to be really organic with lots of texture and movement and so far so good.  Enjoy

The stitching really made this starburst, burst (lol)

The spot on the top left side is a happy mistake, i spilled some spray and needed to incorporate to the layout.  So i just sewed around and around and around.  Definitely not a perfect circle but that whats make it perfect.

 I used the happy mistake as inspiration for this page.  This time did three spots and decorated each spot.  I love the top one with three stars i like to think it looks like a stars orbiting around a planet.

Saturday 12 November 2016

Love me some Turquoise

The color board at Lindy's stamp gang is turquoise and more turquoise, my favorite color.


And here is my take
I am too tired today to write a tutorial so i will show you some close ups and give you a quick rundown.
I used Lindy's
Autumn Maple Crimson
Steel Shimmer
Gecko Green
to create the background
 I have designed some new chipboard pieces, urban grunge i am calling it.  I used cheesecloth underneath layer for some dimensional.  I sprayed the cheesecloth then ripped and torn it to get fibres.  I used the same Lindy's sprays to color the cheese cloth as create the background.

 Once the whole layout was completed i splatter with white, gold and turquoise acrylic paint.
 Checker stencil- my new favorite stencil, I like to paint in black and white pattern.  Its always a great contrast.  Some random stamping all over background.

I used chipboard designs
Directional
Bright & Shiny

Sunday 6 November 2016

Gypsy Girl

Another layout from the weekend, this album is just rolling out I am not struggling at all, of course since i wrote that i will now struggle.  lol  Here she is Gypsy Girl for Mixed Media Monthly.

Here is the mood board

Lots of movement, texture, layers and organic looking.  Do you know what i mean it just looks very free flowing.  I don't know what word i am looking for, hopefully you can read my mind.


I started with my tea stain paper, I love all the variations in color created with tea staining, I may have to start tea staining more paper all the time.  Apply peacock feathers distress paint through starburst stencil (I created the stencil with corel draw and cut with my silhouette)  Mix white acrylic paint with modelling paste apply through a checker stencil |(Yes again i cut with my silhouette)


I painted the checker in a black and white pattern, adding some stamping with black archival paint and texture stamps.  Next splatter Lindy's Kissin Kernickle Coral and crow's nest copper.  I also puddle on some crow nest copper, here is where you need to patience and let it dry.  I love puddling the color once it dries you get all these color variations and darker edges.
Doodled on some stars


Add photo cluster and pre cut textures.  I lightly distress and ink edges of pattern paper blocks. Once I have glued everything on I use a paint brush to apply color onto layers. I only glue in the center of paper blocks so i can tuck the texture elements in between all the layers.  Since i only glue in the center once i add the color onto photo cluster the paper curves and lifts which I love it gives the layout more movement.


Final touches are:  chipboard embossed with aged bronze embossing enamel,  white and black thread bunched together and around photo what i like to call my rat's nest, splatter with water downed white gesso.