home

Thursday, 29 December 2016

Merry & Bright

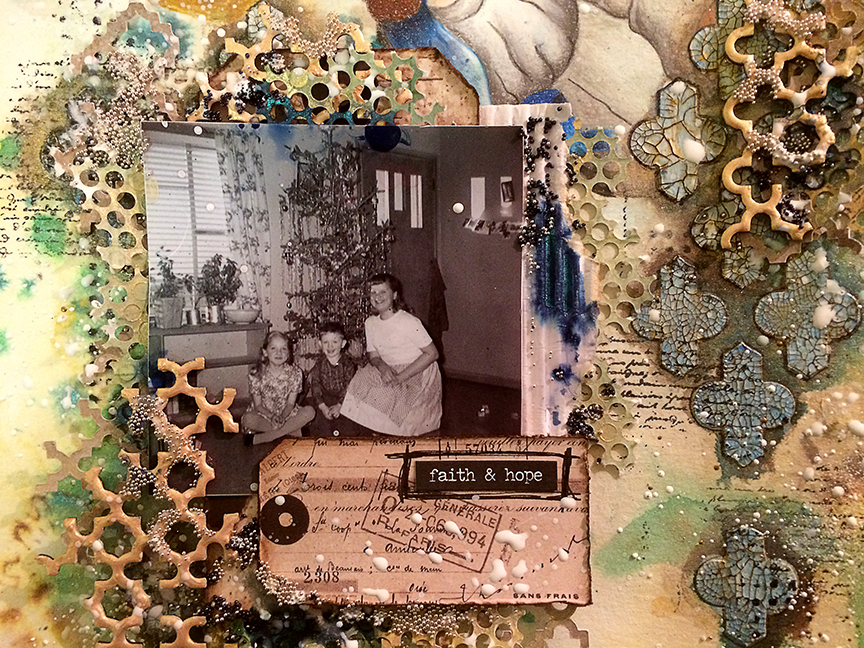
This week i tried my hand at coloring an angel, for the Merry & Bright at The Mixed Media Monthly Challenge. The Christmas pic is an old black and white of my mom and two of her siblings, she is the one on the left side crossed legged on the floor.

I started with watercolor paper that i did a light color wash with my water soluble wax pastels.  Next I found a old vintage print of an angel and drew her onto the top of the page then colored.

Next added some doilys onto page, used a stencil and distress ink.  I wish I used a permanent ink once I started adding more color the distress ink blurred.  Next applied white crackle paste through a stencil, added color around stencil with Lindy's Creme Burle Cream.  At this point is very light color which i like very much I added to much color later on.

Added more color.


I wanted to highlight the stencil pattern, so
Step 1- Used a paint brush and ground espresso distress ink to darken around pattern
Step 2- Sharpen a black water color pencil dip point into water and outline around pattern.  Needs to be super sharp and you will need to continually dip in water.
Step 3- Use a baby wipe to wipe off excess color on pattern
Step 4- Paint pattern with blue acrylic paint, then add a light coat of gold acrylic paint
Step 5- Lightly rub a brown water color pencil on cracks of pattern.  This will highlight the cracks

Phew you tired?

Here's how it looks.  Now here is where i think i added to much color, I wanted it to be a lighter page, thought it would look more angelical you know since there is an angel and all.


Finished layout with photo cluster.  I used tags, chipboard wallpaper texture, microbeads, corrugated cardboard, and cardstock texture.

Before the cluster went down sprinkled Stampendous shabby white embossing powder on page heat from the bottom to set.  Next randomly stamp with texture stamps and black archival ink.

To add the micro beads randomly paint on gel medium while it is still wet sprinkle with micro beads.  To finish add journal statement and splatter white gesso on clusters.


Now for the close ups- I love the close ups, I always like my pages more in the close ups lol.  I really think the photo cluster would pop more if the background was lighter.  Next time that is the goal.

I am now up to 48 followers almost made my 50 follower mark by the end of the year.  Thanks everyone.


Wednesday, 21 December 2016

Traditions and Handmade

Trying out a new challenge blog More than Words, this month challenge is Traditions and Handmade

I tried another page with a bird drawing, I don't fully love this one, and it was a fight from beginning to end.  Why is it some layouts just flow then the next is a struggle.  When it is a struggle I can't leave it alone.  I know you should take a moment but i just keep going in the hopes that it finally clicks.  No turtorial today, I am tired my silly dog keeps getting up in the middle of the night I need 8 hours straight no interruptions.  The night Alex finally slept through the night was the best night.  What was i thinking a puppy????

I started with creating a watercolor background then drew and colored a bird on top- this is the handmade portion, made my own paper.
Tradition- Every Christmas when we were little we would going tree hunting.  My dad, sister and I would get all bundled up and hunt for the perfect tree, first my dad would drive and drive, then we would trudge through the snow (calf deep snow).  My sister and I would suggest trees, Dad would always say no we can do better, then we would usually cut down the first one we saw LOL.  Now my sister and I continue this tradition with our children and spouses.  And you know what i also looked at bunch then picked the first one we saw.


The close ups
I love how tangled threads looks adds movement but it not heavy and clunky or solid you can still see through.  Very organic.
 Underneath these layers is a birdcage with layer after layer of media until i finally got what i was looking for.  First embossed with stampendous ochre embossing emamel, then added umber paint on top and wiped off excess- diluted enamel color. While the paint was still wet i sprinkled on black micro beads, next covered birdcage in glossy accents.  layers layers and more layers
 My favorite portion-mixed modeling paste with rust mica powder applied through a stencil then added color with Lindy's and a paint brush around stencil.  To get the Paris to really pop I applied glossy accents on top once dry it looks all bright and shiny and much easier to see.


Love the circle mesh bits cut from cardstock with my silhouette, I usually add to all my layouts.

Thanks everyone I have tons of blog views this last week and have two more followers.  Whoo Hoo

Merry Christmas Everyone, have a fantastic holiday.

Saturday, 17 December 2016

Winter Wonderland

So for this challenge Winter Wonderland at Mixed Media World i continued with drawing onto a background and coloring with my prismacolor pencil crayons- my new tool obsession.  It started here

I sprayed onto watercolor paper with Maya Mister Huey's and water, just wanted very loose watercolor paint effect.  Next i found an image i like on the net and drew it onto the page.  Color with prismacolor pencil crayons.  These pencil crayons blend beautifully.  Now at this point i debated if i was going to leave as a drawing or create a page.

I added more.  Started with adding a texture with modeling paste and harlequin stencil.  Next painted with Lindy's Whale Watch Blue.

Next add another layer of texture by inking with iced spruce distress ink through a flowered stencil. Then randomly stamp with black archival ink and texture stamps around harlequin pattern.
Now several new layers.  First sprinkle Stampendous aged ivory embossing enamel on/ around harlequin pattern.  Heat from bottom- I like to do this so i don't need to use a embossing ink. Next splatter with Lindy's Whale Watch Blue, then while it is still wet spritz with water- it will slightly blur like water splashing onto a flat surface.  Repeat this step with Lindy's Golden Doubloons.  Outline around harlequin pattern with a black pen.


Rip up some cardboard, expose some corrugated liner.  Paint with white gesso, then spread translucent crackle glaze on cardboard.  Allow to dry completely.


Paint cardboard with a combination of Lindy's Whale Watch Blue, Lindy's Clam Bake Beige, and Prima Green Opal Magic mica powder mixed with water.  To define the crack more I slightly wet the tip of a brown water color pencil and colored cracks.  I rubbed in with my fingertip then wipe off the excess from top.  I have been reading Scraps of Elegance Blog by Joyce Kers, this is where i read about this technique.  This blog is fantastic for ideas and inspiration.

Next add microbeads into corrugated layer- use gel medium to glue on it dries clear.  Don't they look magical?  Not pictured here- i inked the outside edges with ground espresso distress ink.

Next i painted texture chipboard with white gesso and while it was still damp sprayed with Mister Huey's Manila color mist, now while that is still wet sprinkle with clear embossing powder.  Heat set embossing powder.
I don't have a picture of it but i rubbed alchemy paint opal magic rose gold paint along top- gives it a nice pearlized shimmer.


Here are the elements pulled together.  I cut out stars from cardstock and colored with Lindy's Clam Bake Beige and Golden Doubloons.  Add my favorite circle mesh texture bits behind cardboard. The picture is from my mom's family photos I love old black and white photos.  I wanted to added a little shimmer and lighten up the circle mesh bits so I lightly painted with Prima green opal magic mica powder with water.  Finally (yes one last step) spatter photo cluster with water down acrylic paint. I like to water down the its splatters easier.


Next the close ups.
This was a fun project, love the final look a mix of grunge/ distress, fine art and sparkle.


Monday, 12 December 2016

Frosty Blue Morning

The mood board for Mixed Media Place is
Very Frosty Blue Morning


Here is my take, I love how this turned out. Things i love most is the crisp cream background and the pencil color leaves.  I started with plain cardstock and added Prima color bloom in the center.


I don't like to spray color onto page, I have no control where the spray goes and i don't like overspray. Instead apply color bloom to page with a paintbrush or with the end of spray nozzle then spray with water. The water moves the color and fans it out but no overspray.


Love this!  I wanted to try coloring on a page, Love Love how it turned out.  I drew on the leaves free hand then color with Prisma Pencil Crayons.  These crayons rock they have a softer lead and blend beautifully.  I always wanted this pencil crayons as a kid but they are super expensive and my mom refused understandingly.

I like how you can see the color bloom behind the pencil color leaves.  I will be using this technique again.

Created the layering photo cluster.  I was hoping more of the leaves would be visible but you never know what is going to happen until it happens.

Now for the close ups.


Sunday, 4 December 2016

Mail Art

This month challenge at Mixed Media World is mail art.
I love the blue and red slashes around airmail envelopes, I don't know why but i love how it looks. Maybe it that whole remembering a time gone by, I use to love getting letters in the mail back before emails, texting and long distance phone calls were a big deal you didn't not make long distance phones calls unless it was super important.  I use to walk down to the end of the driveway put my letter in the mailbox with 35 cents on top for a stamp.  Who didn't have a pen pal, sometimes i would even write my friends letters during the summer months.  We lived on farm and i really didn't see my friends over summer, this was back in the day when parents didn't take kids to town you played with your siblings or the neighbour's kids.  Anyways that was long winded here is my take

I like the old picture with it looks like a pic you would carry in your wallet when you are off to war.

I made two pattern paper blocks added checker texture with modelling paste.  Distress and inked the edges.

I painted around the edges red and blue slashes with some white gel pen doodling.  Added color with steampunk magicals (Lindy's) and gold.  I like to paint my color on, this way i control where it goes I there is no control with the spray nozzle.  I do spray water on usually after i added color it helps move the color around easier.  I painted the checker black- you will see the next couple pics.

Now for the background, more checker texture painted blue with red magical and gold color added around texture.
Here is the pattern paper blocks layered together. Looks very vintage


Glued onto background with banners tucked in between layers.
Cardstock textures bits added in.


I painted chipboard air mail first with white gesso, then painted with steampunk magical and gold paint. The steampunk magical is fantastic it looks very distress with several colors- red, brown, gold highlights.

Airmail chipboard tucked inside layer and between banners and texture.  Another shout out to mail art, covered package tags with pattern paper, ink and distressed edges, folded over edges and tied together.  Very old school parcel wrapped with twine.

 The close ups.