home

Thursday, 26 November 2020

Victorian Christmas Advent Calendar

 Good Evening all,

I am obsessed with building little houses lately, I love making 3-D projects on canvas or substrate.  Right now I am all about Victorian storefronts, here is an advent calendar I made to look like a scene right out of Dickens Christmas Carol. Enjoy!

The finished size is 30"x17" and 2" deep.  The frame is made with MDF and the boxes are 2"x2".


The storefronts are made with chipboard that i bend, shape and layer into a 3-D form.  I use 3M Scotch glue quick drying tacky glule to hold everything together I found this as the best product for crafts.


The doors have black cardstock behind the window, then i fill them with Mod Podge Dimensional Magic, makes it look like glass window.  For the storefront windows I used clear acetate, this protects the inside decor and keeps dust down.

I printed some toy Victorian images, cut them out and stood them up in the window to look like a window display.  I wrote the shop names on with a paint pen.


The curved window are my favorite!!  Everything is painted with acrylic paints.  I start by painting the base color, add some distressing with light gray, then add brown especially in the edges and corners.  Finally i bring in highlights- a lighter base color.


All decoration are the smallest items i could find a the craft store.  The garland and wreaths are made with green matte pipecleaner, I twisted two together so they were fullier.  I had to trim the pipecleaner otherwise it was too thick and long.


The bay window is removable and behind it is the battery pack for the mini LED lights.  The LED Lights are in the storefronts, lights up the decor.


The bricks are made with 1" insulation foam that you can buy from the hardware store.  I distress the top of foam with scissors then carve the bricks into the foam with my hot knife pen used on foam.  Layers and layers of paint make it look old and worn.  Start with dark and work up to light.


I used matte gel medium to adhere fake snow to the windows and garland.
Boxes are made with thin (think cereal box thickness) chipboard and covered with paper.


I am very happy with the final result.


Saturday, 5 September 2020

Diagon Alley Book Nook

I came across this wonderful DIY video from Nerdforge and had to make my very own Diagon Alley Booknook.  This was a fun start to finish!

I made it a little too big I will adjust the next one.  Its final size is 9"x5"x12".  I used 1/8" MDF for the frame- next time this will be 1/4".  This is what a prototype is for, to work out the kinks.


The bricks are made from foam bought at the hardware store.  I cut into different sizes then used scissors to distress to make them look like stone. I stuck on MDF frame with concrete molding paste. then painted with black gesso.  Next used a stencil paint brush to add color, use a variation of brown/grey for stone effect.
The floor is made with modling paste, a stencil and paint.


The storefronts are made from chipboard, designed them in corel draw then cut with a laser engraver.  Next just lots of patience to shape and form into 3-D structures with moulding and doors.  Painted with acrylic paint and distressed.


All the signs and lanterns are made with chipboard, glued on some printed paper signs.  Finally used a string of LED lights in the windows to light up the book nook.

I can't wait to make another one, and different scenes.  


Tuesday, 1 September 2020

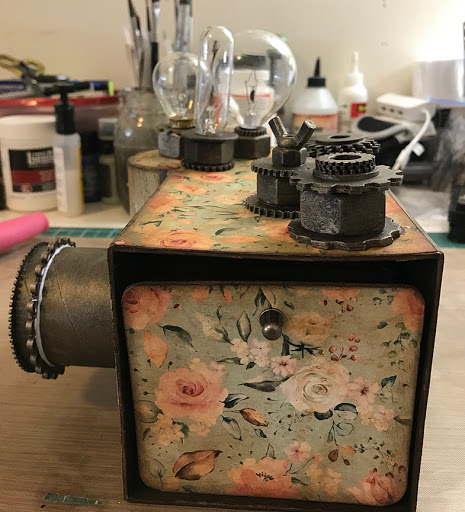
Camera Box

I saw a camera kit on Kits n Kabooble and loved it so i decided to build my own.  Here is my take

My favorite thing is the light bulbs, found smaller fun shaped ones at the grocery store, perfect.


Inside camera frame is a concertina that i made after watching a tutorial from Kits n Kaboodle.  Really love of the shape of the concertina resembles vintage folding cameras.  Concertina contains mini booklets and photos slides.


View from the top.


To make the mechanicals i layered together bolts, washers, and chipboard gears.  Paint with black gesso, then paint with umber brown acrylic paint.

Next rub on alchemy white gold wax with fingers or a stiff bristle brush.  The final look is fantastic, aged metal.


Saturday, 15 August 2020

Wander Exploding Box

I created a magical fairy stump exploding box using Simple Stories Vintage Great Escape.  I just loved the mushrooms and wanted to make them the focal point.

The stump was created by making a tube with thin chipboard.  I covered the tube with chipboard planks covered with woodgrain pattern paper.  I made several planks in varies sizes, some of the planks overlap for dimension.


I made dividers to quarter the stump to hold the apothecary bottles.  You could add water, sand etc.. to the bottles.


I folded the bottoms of the mushrooms so i could stand them up around the stump.  The fungi growing on the trees is made with thick chipboard, and covered with pattern paper.  I paper tabs to attach fungi to the stump.


I positioned the mushrooms at varies depth around the stump- more dimension love me some dimension.

I made 3 matchbook mini booklets and 3 accordian mini booklets for the box sides.  Lots of room for photos and/ journaling.


Really happy with how it turned out.  Til next time...

Wednesday, 22 July 2020

Creations

Lots of creations lately just not a lot of posting about them, I have also added a bunch of new designs onto the etsy store- Boozybear.  Here is what i have been up to

3D gas pump with pull out album.  I designed a whole bunch of garage inspired chipboard to use on with the album.  This kit sold out at Treasured Memories in One DAY, One DAY and they ordered 15 more so thank you scrapbookers.

I used pattern paper in black/grey tones then added the color with watercolor paints.  I love that the color it is muted and you can see the pattern in behind still.  Of course add some distress ink for that old vintage feel.


Here are some of the pages inside album.  Found some great sign, and garage ephemera sheets from etsy to use throughout album.

Used lots of envelopes, index cards, pockets and tags to make fun interactive pages.


This album would be perfect for the mechanic in your life.


Next came some fun cards with a vintage twist.  I created retro campers. old school volkswagon, samonsite suitcases etc.. to match with Mintay Wanderlust paper line.


I like to add glossy accents or mod podge dimensional magic into windows so they look like glass.


Love this suitcase, i have added stitching details that really make it pop.  Since this is samsonite luggage I wanted it to have that glossy smooth look so i also added mod podge dimensional magic on it.


There are 9 cards total in this kit.


I created coffee, lamps, radios, pumpkins and more to match Mintay Cozy Evening paperline.  I think the pumpkins are my favorite LOVE LOVE the detailing in the stems and leaves.  Used stitching technique for pumpkin details.


The yarn balls look fantastic and again used the stitching technique to make the details.  The stacked coffee cups are indivdual pieces that fit together like a puzzle.


Another favorite new design is vintage radios, they have multiple pieces that layer together for a detailed vintage shape.

There are 10 cards in this kit.


All shapes used in Cozy Evening, Wanderlust and gas pump kits are now on etsy store Boozybear.  Also uploaded instructions for gas pump.

Keep on creating!

Sunday, 24 May 2020

Retro Inspiration Cards

I love stacked suitcases so i figured lets make some chipboard designs.  At first i wasn't 100% sold on how they looked but, once i painted, distressed, inked, and added latches- in love with them.


You could paint the suitcases any color you want to match whatever project you are looking on

I used Mintay Haromony Papers- This is my first time working with these brand and I love it.  They have a paper embellishment 12x12 page with great emphemera.


First i paint chipboard, allow to dry  completely (I like to dry overnight).  Lightly sand, then ink (I used vintage photo distress ink)  Wipe off excess ink, the ink will settle into sanded portions, and wipe off painted portions.  All latches painted gold then glued on.  You could distress them too but they are super tiny so i didn't bother.


New vintage inspired pieces now available on Etsy store

Fans


Vintage Cameras


Hanging Plants


Vases


Movie Cameras


Pails 

Stacked Suitcases


Wednesday, 15 April 2020

Postcards from the Edge of Covid-19

I created some postcard kits using stock in my house- it is really amazing what you can find in your stash when you have time.
Lots of grunge, lots of layers.  My favorite part is the globe.


So the globe came all in one piece, painted the water blue and land masses green.

Let the globe dry, lightly sand, then ink now it looks old and worn.  Next cut apart land and water.


Now put it back together, but the land masses are raised using pop dot.  Love how this looks!!!


Postcard 2
Again lots of grunge, lots of layers, lots of little accents pieces.


When i painted this one, I faded the color out at the bottom.  Once this is sanded and ink....


it looks like this.  Really like the final look.


Postcard 3
I used old rubons from Tim Holtz, you can't get this rubons anymore which is shame.  I wish there were more rub ons out there, I love a rub ons.

I made a belt with filmstrip and a buckle.  The filmstrip is great, it is partially transparent but the outline of film is visible.  That whole there but not there.

Postcard 4
Here i used two tags folded over edge and attached with twine.  Whenever you can add twine makes for fun.


I covered the bottom of tag but left the top the original manilla, I really love the tab around tag hole and don't like to cover it up. Inked around the edge, a lot.


Here are some goodies i used to create all those layer and clusters:
- rub ons
- gears
- paper emphemera
- metal tabs
- paper clips
- stapler
- bingo chips
- index labels
- tags
- twine
- buckles
- hitch posts
- thread spools
- medallions