Over at 13 Arts they have this lovely moodboard challenge for February
So here in Cold Lake we are in the deep freeze, we had 3 weeks at -40 celcius but recently warmed up to -25 celcius so I guess things are looking up. lol I used the tones and colors from the moodboard for my creation.
Here is my creation, I have to say I love it. The final look ended up being old, vintage, like old architectural sketches. I used some new chipboard pieces, clay casts, and 7 dots studio papers.
Used the following chipboard and
stencil available on my etsy store
Boozybear
Pillars
Metal Gate
Postage
European Ironwork
Latin Stencil
I painted pillars chipboard white, let it dry then sand it slightly, ink with oxide peacock and ground espresso inks. Now it looks old and patina. I am still debating covering with glossy accents so it looks more like metal.
I used latin stencil and modeling paste to create the background, paint in with raw umber acrylic paint. I water it down to blur edges, and get color variations, very antiquey. I highlighted the latin words with white gold alchemy wax.
I made the windows with polymer clay and silicone molds, I really like using clay and molds you get detailed casts but they are flat on the back much easier for gluing down.
I usually make a cluster with paper layers and embellishments but i really love how the embellishments are placed randomly around the layout.
See you soon (hopefully not a month and a but will pass again before a post)
Monday, 25 February 2019
Friday, 11 January 2019
Around the World
This month is Anything Goes with Blue at More Mixed Media Challenge.
I had to make this project 3 times to get it right, there are still changes I would make but overall I am happy with it. It is really hard to photograph you can't see the colors or the interior details as I would like. The base is made of an upside down bowl, but once it is all painted it looks like a brass lamp base.
Here is a close up of the continents, they are a combination of Alchemy paints- Magical Pond, Deep Waters, and Brass Hardware. Layering the colors really gives it a tarnished metal.
The globe is made of twine, modge podge and a balloon. Inside I made a mechanical core with gears and planets.
One of planets i cut in half then added some chipboard moons and stars. The planet has been painted with Alchemy blues and unicorn's hair.
The continents were made with black chipboard gears, hexagon shapes, clocks and lightbulbs. This project takes a lot of patience because you need to let everything dry overnight- I hate letting this dry overnight.
Enjoy.
I had to make this project 3 times to get it right, there are still changes I would make but overall I am happy with it. It is really hard to photograph you can't see the colors or the interior details as I would like. The base is made of an upside down bowl, but once it is all painted it looks like a brass lamp base.
Here is a close up of the continents, they are a combination of Alchemy paints- Magical Pond, Deep Waters, and Brass Hardware. Layering the colors really gives it a tarnished metal.
The globe is made of twine, modge podge and a balloon. Inside I made a mechanical core with gears and planets.
One of planets i cut in half then added some chipboard moons and stars. The planet has been painted with Alchemy blues and unicorn's hair.
The continents were made with black chipboard gears, hexagon shapes, clocks and lightbulbs. This project takes a lot of patience because you need to let everything dry overnight- I hate letting this dry overnight.
Enjoy.
Sunday, 11 November 2018
Woodland Mushrooms
I created this collage with Mixed Media Place October Challenge in mind, here is the mood board
I was planning on using metallic purple and green but the piece took on a life of its own.
It ended up being more brown, still not 100% if I like but it does look better in natural light.
So lots and lots of layers. Used some new chipboard pieces- twig balls, postage frame, and twigs They are all available on my etsy store
Boozybear.
I wanted it to look like the cluster found in a bird's nest so I used odds and ends in my stash. Used texture paste, alchemy paints, beads, sequins, and vintage wax for coloring.
I like angled shots you can see all the different layers.
I love making lightbulb out of vials, I add a wire fuse through cork then added some art stones and paint around edge.
Lots of new pieces up on etsy store tonight, this one is my favorite mason jar lights.
Mason Jar Lights
I was planning on using metallic purple and green but the piece took on a life of its own.
It ended up being more brown, still not 100% if I like but it does look better in natural light.
So lots and lots of layers. Used some new chipboard pieces- twig balls, postage frame, and twigs They are all available on my etsy store
Boozybear.
I wanted it to look like the cluster found in a bird's nest so I used odds and ends in my stash. Used texture paste, alchemy paints, beads, sequins, and vintage wax for coloring.
I like angled shots you can see all the different layers.
I love making lightbulb out of vials, I add a wire fuse through cork then added some art stones and paint around edge.
Lots of new pieces up on etsy store tonight, this one is my favorite mason jar lights.
Mason Jar Lights
Tuesday, 30 October 2018
Magical Woodlands
Here is the mood board from Mixed Media Warriors
Very much Fall colors
I found this FAB tutorial from Anastasia Elena and came up with this
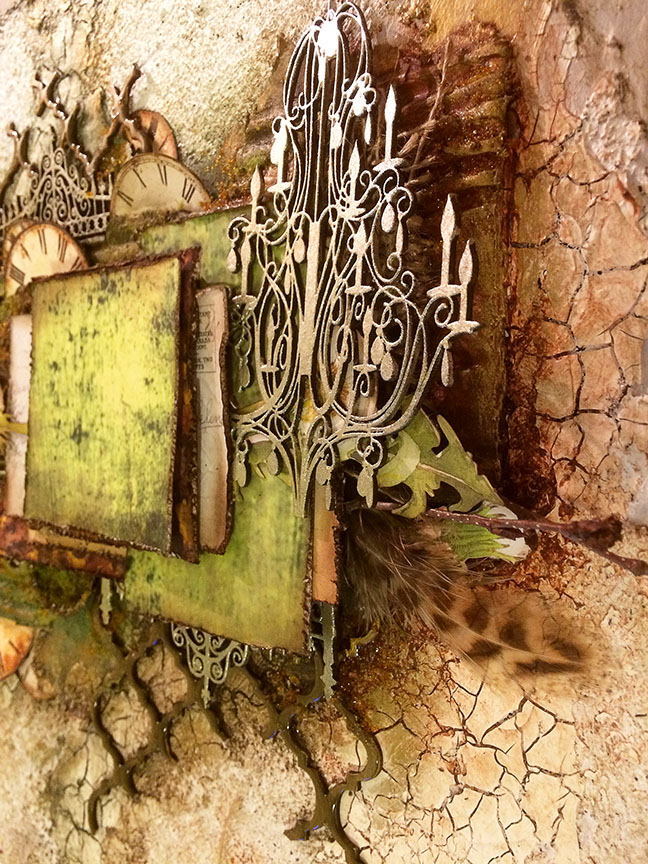
The background is created with texture paste, crackle paste, rust paste, camo paste and cardboard. I LOVE how this turned out.
I exposed the ridges of the cardboard- more texture = more interest. The cardboard works great to tuck in paper die cuts in between the layers.
Lots and lots of layers. The paper die cut are from 49 and Market, the paper are from Ella and Viv, chipboard is mine- Boozybear
I added some twigs and feather, wanted it look like things you find in a bird nest along with a romantic twist- all the frilly chipboard.
I added some glossy accent on pattern chipboard and paint ironwork chipboard with Alchemy sparks paint so super shimmery. The green stucco is embossing powder I applied with gloss gel but didn't heat set. (My heat gun broke so a happy accident)
Love how this turned out, it is a favorite of things i have created lately. Wouldn't a new born picture work fantastic with it??
chow for now. g
Very much Fall colors
I found this FAB tutorial from Anastasia Elena and came up with this
The background is created with texture paste, crackle paste, rust paste, camo paste and cardboard. I LOVE how this turned out.
I exposed the ridges of the cardboard- more texture = more interest. The cardboard works great to tuck in paper die cuts in between the layers.
Lots and lots of layers. The paper die cut are from 49 and Market, the paper are from Ella and Viv, chipboard is mine- Boozybear
I added some twigs and feather, wanted it look like things you find in a bird nest along with a romantic twist- all the frilly chipboard.
I added some glossy accent on pattern chipboard and paint ironwork chipboard with Alchemy sparks paint so super shimmery. The green stucco is embossing powder I applied with gloss gel but didn't heat set. (My heat gun broke so a happy accident)
Love how this turned out, it is a favorite of things i have created lately. Wouldn't a new born picture work fantastic with it??
chow for now. g
Saturday, 20 October 2018
Winter Trees
This month at 7 Dots Studio the challenge is this mood board
Look at all those beauitful colors.
I used 7 dots Northern Lights paper collection. These paper collection has fantastic colors and of course as always all the cut outs.
Here is my creation with a few of my favorite things- sewing, stamping, harlequin pattern, and of course CHIPBOARD.
I started with my blank page, added some inked pattern paper circles, then sewing. Sewing sewing sewing around the circles, it doesn't need to perfect circles as you see but adds so much. Add some harlequinn texture with turquoise sparkle paint.
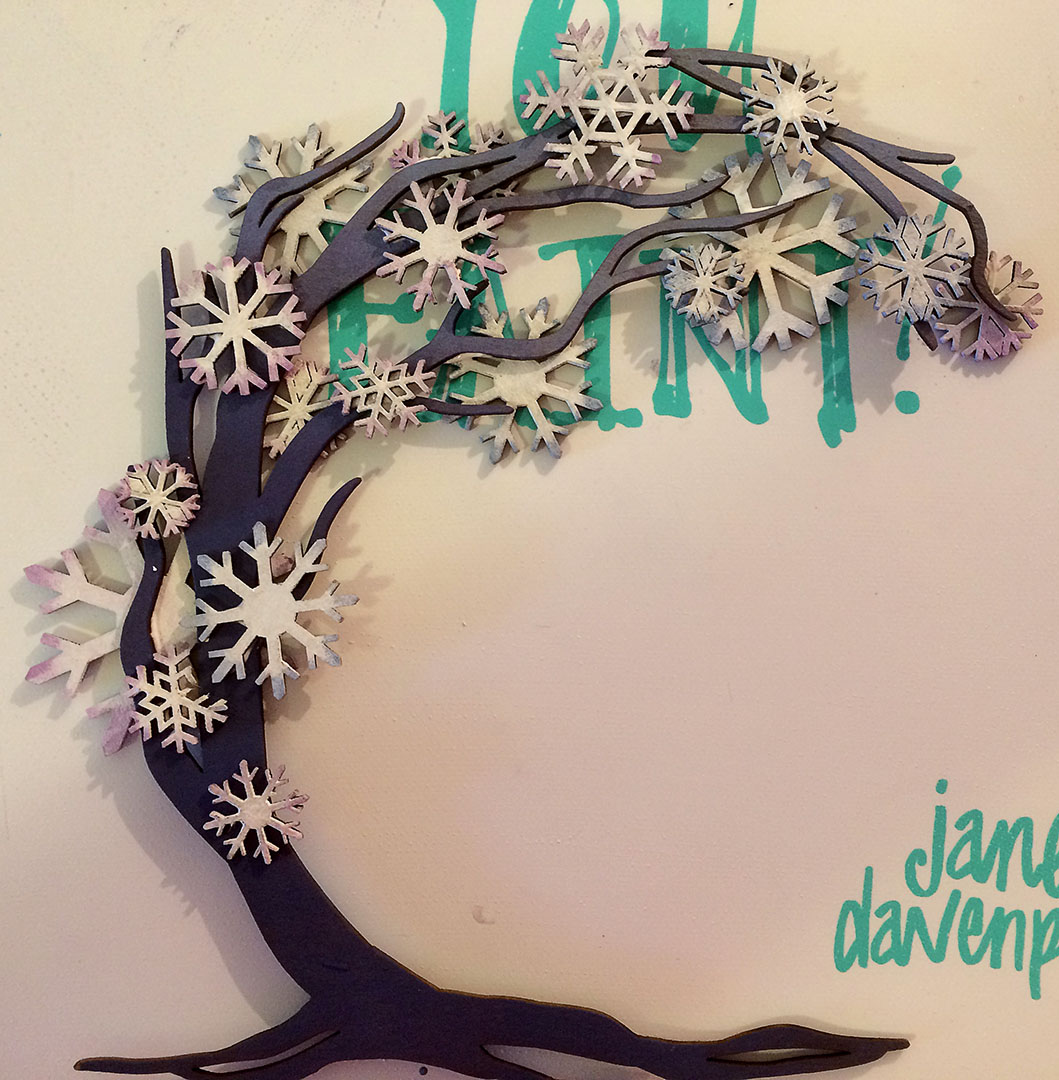
Here is my favorite part- this a new design and it worked exactly like I had imagined. I painted the tree in an ombre fade light blue to dark blue. Snowflakes are painted white (this takes several coats) then I just colored the edges with shades of purple, and blue. Layer it all together, the key here is to layer some underneath- adds so much dimension. There you are a snowflake tree.
Then i put it all together- added a corner cluster, and random stamping. Behind the tree I added color with Lindy's Mad Hatter Mint and Danny Zuko's Denim.
Among the snowflakes in the tree I added silver microbeads.
The geometric and mini snowflakes give you lots of sizes to choose from great for layering.
7 Dots die cut sheets are amazing for layering and making little cluster sections. Grunge it up with black ink and texture stamps.
Love the sewing circles.
The final touch is splattering white paint around leaves, I like to think it makes it look like it is sparkling and snowing.
The following chipboard pieces are available for purchase on my etsy store Boozybear
Wind Swept Tree $6.75
Geometric Snowflakes $8.75
Mini Snowflaske $4.25
Look at all those beauitful colors.
I used 7 dots Northern Lights paper collection. These paper collection has fantastic colors and of course as always all the cut outs.
Here is my creation with a few of my favorite things- sewing, stamping, harlequin pattern, and of course CHIPBOARD.
I started with my blank page, added some inked pattern paper circles, then sewing. Sewing sewing sewing around the circles, it doesn't need to perfect circles as you see but adds so much. Add some harlequinn texture with turquoise sparkle paint.
Here is my favorite part- this a new design and it worked exactly like I had imagined. I painted the tree in an ombre fade light blue to dark blue. Snowflakes are painted white (this takes several coats) then I just colored the edges with shades of purple, and blue. Layer it all together, the key here is to layer some underneath- adds so much dimension. There you are a snowflake tree.
Then i put it all together- added a corner cluster, and random stamping. Behind the tree I added color with Lindy's Mad Hatter Mint and Danny Zuko's Denim.
Among the snowflakes in the tree I added silver microbeads.
The geometric and mini snowflakes give you lots of sizes to choose from great for layering.
7 Dots die cut sheets are amazing for layering and making little cluster sections. Grunge it up with black ink and texture stamps.
Love the sewing circles.
The final touch is splattering white paint around leaves, I like to think it makes it look like it is sparkling and snowing.
The following chipboard pieces are available for purchase on my etsy store Boozybear
Wind Swept Tree $6.75
Geometric Snowflakes $8.75
Mini Snowflaske $4.25
Sunday, 16 September 2018
Mixed Media & Art- Journey
This month at Mixed Media & Art the moodboard is
This is right up my alley. Here is my creation.
Gone back to my steampunk roots. A tag trio. Metallic Alchemy Paint, embossing enamel. rust paste, chipboard, modeling paste, and metals.
I think this is my favorite with the 3-D spectables, I used clear plastic, then colored with alcohol inks.
Underneath clock pocket watch, I layered gears and painted them with rust paste. This one has my favorite background.
Start by scoring background paper. Add brads along score lines, not all just some.
Paint entire tag brown, dry. Mix white pearl and mermaid teal alchemy paint together, paint tag with several coats.
Rub some umber acrylic paint on tag, let it sit for awhile still it is tacky. Now wipe off brown paint, not all of it leave some around brads, along edges, and along score lines. Looks tarnished now.
Add some red oxide paint in some random spots. Now tarnished and rusted.
A lightening bug, the wings are printed on transparent paper, then I cut out and glued on the body of lightening bug.
Harlequin pattern on the background, because I love harlequin. The wings are the chipboard with three layers so they have lots of dimension.
This is right up my alley. Here is my creation.
Gone back to my steampunk roots. A tag trio. Metallic Alchemy Paint, embossing enamel. rust paste, chipboard, modeling paste, and metals.
I think this is my favorite with the 3-D spectables, I used clear plastic, then colored with alcohol inks.
Underneath clock pocket watch, I layered gears and painted them with rust paste. This one has my favorite background.
Start by scoring background paper. Add brads along score lines, not all just some.
Paint entire tag brown, dry. Mix white pearl and mermaid teal alchemy paint together, paint tag with several coats.
Rub some umber acrylic paint on tag, let it sit for awhile still it is tacky. Now wipe off brown paint, not all of it leave some around brads, along edges, and along score lines. Looks tarnished now.
Add some red oxide paint in some random spots. Now tarnished and rusted.
A lightening bug, the wings are printed on transparent paper, then I cut out and glued on the body of lightening bug.
Harlequin pattern on the background, because I love harlequin. The wings are the chipboard with three layers so they have lots of dimension.
Monday, 10 September 2018
Purple Trees
I have about 3 projects on the go right at the moments, today I created a cover for my new class-
FAMILY, FAITH, and LAUGHTER. This is a tribute album to my cousin Gina, she doesn't have much time left but instead of wallowing she is embracing her final moments. Recently they planted a purple tree for a memento for her children when she is gone. I have created a purple tree for the album cover- purple is her favorite color.
Tree was created with polymer clay, curly moss, paper and wire. This is exactly what i saw in my mind, so happy it worked.
I started with snakes of polymer clay, that tapered smaller at the ends. Then twist into a tree trunk, the seperate lengths of clay become the limbs.
The leaves were super painful to make, I cut the leaves with the silhouette then glued two together with a wire in the center. Very time consuming.
Once the tree is shaped, insert wire leaves into limbs before it is baked.
The background paper was painted with umber acrylic paint, once dry add harlequin texture with modeling paster mixed with black paint. Layered onto top is alchemy blue-gold paint, muted with a thin layer of umber again. Then start adding waxes- white gold, amethyst and vintage gold.
I wanted the background of cover to look old and tarnished. Layered underneath tree is curly moss, gives the tree that full bushy look.
Love how it turned out!
Stay tune for more, next I will make the album.
FAMILY, FAITH, and LAUGHTER. This is a tribute album to my cousin Gina, she doesn't have much time left but instead of wallowing she is embracing her final moments. Recently they planted a purple tree for a memento for her children when she is gone. I have created a purple tree for the album cover- purple is her favorite color.
Tree was created with polymer clay, curly moss, paper and wire. This is exactly what i saw in my mind, so happy it worked.
I started with snakes of polymer clay, that tapered smaller at the ends. Then twist into a tree trunk, the seperate lengths of clay become the limbs.
The leaves were super painful to make, I cut the leaves with the silhouette then glued two together with a wire in the center. Very time consuming.
Once the tree is shaped, insert wire leaves into limbs before it is baked.
The background paper was painted with umber acrylic paint, once dry add harlequin texture with modeling paster mixed with black paint. Layered onto top is alchemy blue-gold paint, muted with a thin layer of umber again. Then start adding waxes- white gold, amethyst and vintage gold.
I wanted the background of cover to look old and tarnished. Layered underneath tree is curly moss, gives the tree that full bushy look.
Love how it turned out!
Stay tune for more, next I will make the album.
Subscribe to:
Posts (Atom)