home

Sunday, 31 December 2017

Mixed Media Monthly Challenge #44

It's a new year and a new challenge this month's challenge is "Ring in the New" so have a "new" component like color, medium, or technique it just needs to be new to you.  Here is the graphic

I used some new chipboard, new skeleton leaves, and new primary elements.


I started with pattern paper, glue on burlap, ripped up cardboard and chipboard crank.  I added clusters of art stones, and mini art stones glued down with gel medium.


Art stone clusters, they don't look that good right now but just you wait...


I added some more chipboard pieces then painted the entire collage with brown rust paste.  I like the texture in the rust paste and how it dries matte and dark.  I don't like harsh edges created by paint so i blend and fade with a baby wipe.  Once rust paste is dry sprinkle on primary elements Vintage Mint, Mediterranean blue and Chestnut Brown spray with water to activate- adds twinkle.

Go over with green patina paint just in random spots not all over.


Next I rubbed on some blue patina paste, I added some brown paste back on top it was a little too green and blue.


Next rub alchemy gold wax on entire collage, it highlights all the wonderful texture and art stone clusters.  I painted equation chipboard with delphinium blue Lindy's, the shimmer is really noticable on the dark background.  I colored the cheesecloth with chestnut brown, mediterranean blue, and vintage mint dry completely then paint with sculpture medium to shape in center of page.  Water down some white acrylic paint and splatter onto collage.


Here is the final cover, I created a projection lenses with chipboard and 2" plastic lenses.  As the cover processes I add more color- it is always a working piece of art.


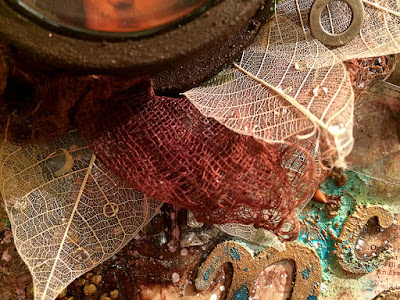
The centerpiece is made with skeleton leaves, cheesecloth and transparent wings.  I added little drops of glossy accents onto skeleton leaves to look like waterdrops.

So many layers and texture- my favorite things.


The dark background of brown rust paste on chipboard letters makes the perfect base for Lindy's shimmer spray.  I painted on Delphinium Blue with a paint brush, the dark background really makes the shimmer pop.  I added some post hitches then wrapped twine around just a fun little accent.


Really love the green and blue patina paste, the Lindy's on the chipboard doesn't settle into the wax but the final effect turned out fantastic with only blue along the bottom of letters.

I love the ridges from ripped cardstock. The art stones clusters look completely different now all those lovely nooks and crannies.


To celebrate the new year my etsy store Boozybear is having a SALE!
Starting January 1 to January 31 spend $20 or more and receive a 20% discount just enter JAN2018 when checking out.




Wednesday, 27 December 2017

Missing in Action

So i have been missing in action for the month of December, it has been a busy month and my creative juices were non-existance.  But i had no choice it was time to create I have a class coming up on January 27, 2018 and it was barely started.  So here is my favorite page
I am obsessed with texture of late I used ripped cardboard, burlap, art stones, mini art stones, chipboard, modeling paste and crackle paste.

I used patina paste and rust paste to paint background then added sprakle with lindy's sprays and primary elements pigment powder.  Originally I used mostly patina and rust paste but I didn't like how dark and matte it was so I added a little twinkle!


the top layer is gold alchemy wax it highlights all that wonderful texture, I just rub on with my fingertips.


The art stones are fantastic, you get some many colors/ highlights/ shadows in the all the nooks and crannies


I used skeleton leaves and sisal this is as frilly as i get. 

I am making an album with three sketchbooks inside this is a cover of one of the sketchbooks.

Stay tune for the cover it turned out FAB!

Thursday, 30 November 2017

Mixed Media Monthly Challenge #43

This is an exciting challenge for me, my little shop Boozybear is this month's sponsor YAAA!
Here is the mood board for December at Mixed Media Monthly- sparklely, shiny- screams Christmas


Sponsored by ME
As December's sponsor Boozybear is donating a $25.00 gift card to the winner to use at etsy store.


So i was lazy this month and didn't take step by step photos but honestly this was super easy only took a couple hours.  I used Mechanical Wings, these are a steampunk wings that has a mechanical chipboard layer on top.  I have a few ( a lot) of layered designs, this way i can get in more detail and dimension in a design.


I started with an old encylcopedia that i had cut out the center- yes by hand with a sharp knife this took forever.  Lucky i did this months ago and never used.  I painted the background with prima alchemy opal magic blue gold paint.  Well the paint was still wet sprinkle on some glitter.


Along the bottom is some bottle trees, resin deer, Christmas balls and snowflakes.  The finishing touch was adding crystal mica flakes for snow, I used gel medium to get the mica flakes to stick.  This is my favorite part- the deer and trees.  Shout out to Melissa for giving me the deer.

The wings were painted with white acrylic paint, then a coat of prima alchemy white pearl, then a light dusting of gold acrylic and then (and finally) embossed with Lindy's angel wings powder.  Can't really tell in a photo but the embossing powder add an iridescent finish that changes color/tone when shifted in light.


The resin face is a prima product painted with white acrylic paint then coated with alchemy opal magic champagne.


I glued the face and wings together with a makeup sponge wedged between them and also one between the bottom of the book and face/wings.  All around is Christmas Ornaments i found at the dollar store cut up into smaller pieces and glued around finally i glued on some clear beads.  Then of course a bird.


Overall it turned out good, but as usual i already gave away.  I like to create but not keep lol, can't wait to see what you make.
g

I forgot of course i added twine at the bottom, needed to add a little something to make it look old.


Sunday, 26 November 2017

Geometric Travel Album DONE

My geometric travel is finished!  I have also finished the instructions, of course i left it right down to the wire, finished today and off the kits went to Treasured Memories.  Here is the completed album front to back.
Cover


Page 1 & 2


Page 3 & 4

Page 5 & 6


Page 7 & 8
My favorite page.

Page 9 & 10

Page 11 & 12

Page 13 & 14

I have two of these kits available on my etsy store Boozybear
Geometric Travel Album

Wednesday, 15 November 2017

November Challenge #42- Silhouette


This month at Mixed Media Monthly the challenge #42 is Silhouette  and the sponsor is

check out Visible Image website they have some reall sweet stencils and stamps.

Now unfortunately my stamps didn't arrive on time I am going to chalk this up to living in Northern Canadian.  They will probably show up tomorrow.

I already had my project planned with the stamps i ordered but since they were a no show I used my eyeball stencil instead.  I wanted a watercolor effect around the eyeball and bright colors.  This is very bright and clean for me but I quite enjoy.


I embossed the eyeball and added some random stamping around outside edges once watercolor was painted.  I love the drippy drips.  I need to pratice some more with watercolors and need to learn when to stop.  I find the eye pupil muddy should have stopped when i was ahead.


Some simple chipboard stars painted gold, once i glued them down i colored in shadows with grey pencil crayons.  I am a little obsessed with shadows right now, easy to do and adds dimension.


The winner of November's challenge gets $50 coupon form Visible Image Pop over to Mixed Media Monthly Challenge.

Sunday, 12 November 2017

Geometrical Travel Double Page Layout

Another page for my geometrical album, this album is completed just need to make the hinge and cover so not 100% but I would say 75% all the pages are done which is the fun part.  Then of course instructions arghhh.

Started with taping the two pages together, then applied rust paste along the outer edge.  I like to use a baby wipe smooth out edges and pull some of the color into the center of the layout.  I also used blue patina paste my friend laughed because she said  it's not part of that kit but I LOVE BLUE!

Add some texture circles and splats with art achemy paints- emerald green, gold rush.  I also added a shadow on the splat.


Map of the World Stencil
10" x 12"
$10.50


More Splatter
10" x 12"
$10.50


Start putting it all together.  Paint chipboard with gold acrylic paint, dry, lightly sand then ink with ground espresso distress ink.  The ink settles into sanded portion and wipes off paint- grungy!

Add die cut elements and draw around with charcoal extending lines pass die cut edges smear with fingertip.

I drew around some of the circle texture with a black gel pen.


Add cheesecloth, I color with magicals then paint with sculpture medium.  If you haven't tried the medium go out and buy it now then play.  The cheesecloth painted with medium will hold its shape so all those wonderful wrinkles and gathered ridges stay.  That's right they stay.


Add your photos and more die cuts.  Sprinkle on embossing enamel and heat set from the bottom, it looks like sprakles.


Here is a super good shot of the embossing enamel sprinkled in cheesecloth.  By heat setting from underneath you don't need to use versamark, if you try heating from the top the embossing enamel will all blow away, far far away.


Thorughout this album i have been experimenting with twine, for this page i made an arrow with brads and twine.  So COOL.

The twine adds another layer but not a solid heavy layer.  Plus since i didn't glue it down you get some shadows on layout.


More fun angles.

Shoot for the Moon Chipboard
$3.25


Looking Glass
$3.75