home

Saturday, 20 October 2018

Winter Trees

This month at 7 Dots Studio the challenge is this mood board
Look at all those beauitful colors.


I used 7 dots Northern Lights paper collection.  These paper collection has fantastic colors and of course as always all the cut outs.

Here is my creation with a few of my favorite things- sewing, stamping, harlequin pattern, and of course CHIPBOARD.


I started with my blank page, added some inked pattern paper circles, then sewing.  Sewing sewing sewing around the circles, it doesn't need to perfect circles as you see but adds so much.  Add some harlequinn texture with turquoise sparkle paint.


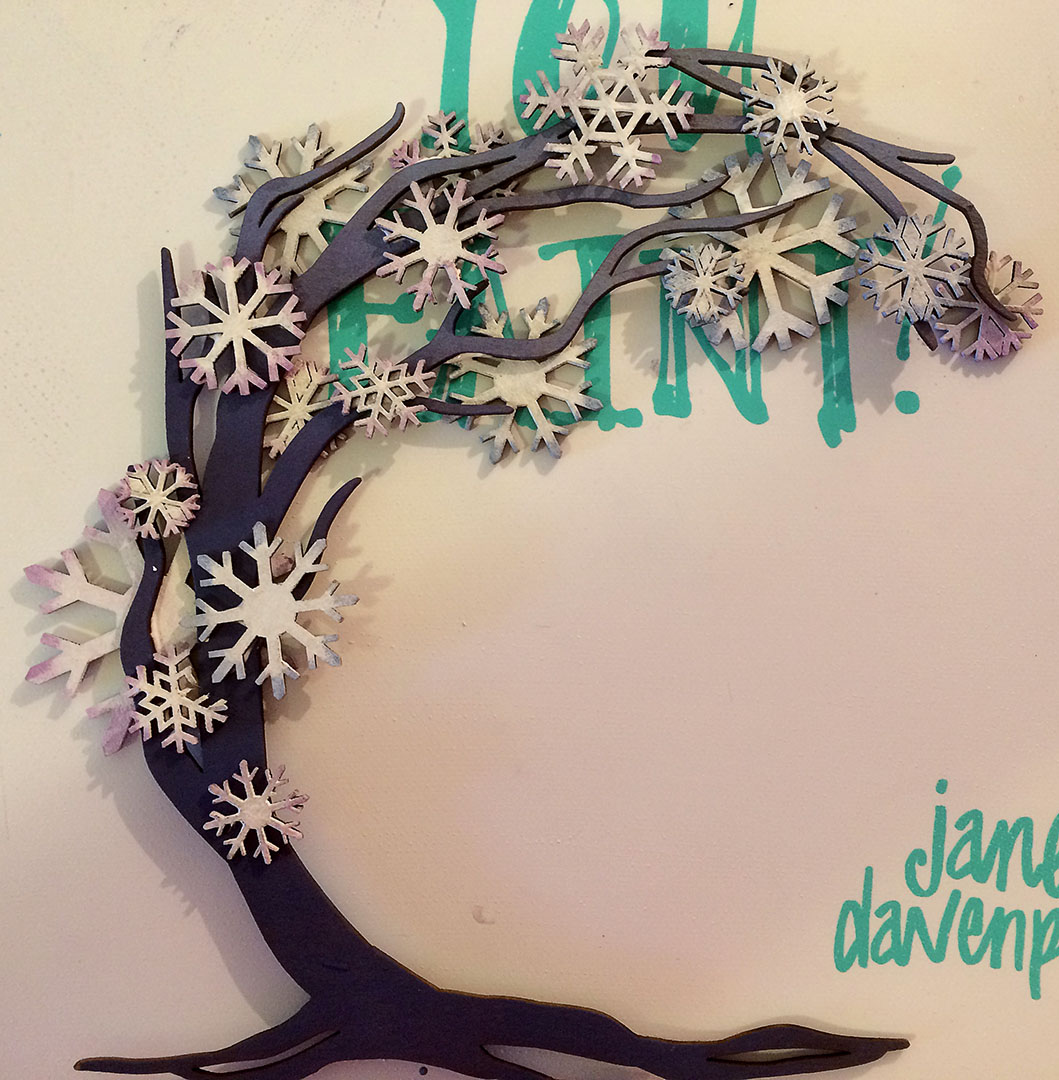
Here is my favorite part- this a new design and it worked exactly like I had imagined.  I painted the tree in an ombre fade light blue to dark blue.  Snowflakes are painted white (this takes several coats) then I just colored the edges with shades of purple, and blue.  Layer it all together, the key here is to layer some underneath- adds so much dimension.  There you are a snowflake tree.


Then i put it all together- added a corner cluster, and random stamping.  Behind the tree I added color with Lindy's Mad Hatter Mint and Danny Zuko's Denim.


Among the snowflakes in the tree I added silver microbeads.
The geometric and mini snowflakes give you lots of sizes to choose from great for layering.


7 Dots die cut sheets are amazing for layering and making little cluster sections.  Grunge it up with black ink and texture stamps.


Love the sewing circles.


The final touch is splattering white paint around leaves, I like to think it makes it look like it is sparkling and snowing.


The following chipboard pieces are available for purchase on my etsy store Boozybear

Wind Swept Tree $6.75


Geometric Snowflakes $8.75


Mini Snowflaske $4.25

Sunday, 16 September 2018

Mixed Media & Art- Journey

This month at Mixed Media & Art the moodboard is
This is right up my alley.  Here is my creation.


Gone back to my steampunk roots.  A tag trio.  Metallic Alchemy Paint, embossing enamel. rust paste, chipboard, modeling paste, and metals. 

I think this is my favorite with the 3-D spectables, I used clear plastic, then colored with alcohol inks.


Underneath clock pocket watch, I layered gears and painted them with rust paste.  This one has my favorite background.


Start by scoring background paper.  Add brads along score lines, not all just some.


Paint entire tag brown, dry.  Mix white pearl and mermaid teal alchemy paint together, paint tag with several coats.


Rub some umber acrylic paint on tag, let it sit for awhile still it is tacky.  Now wipe off brown paint, not all of it leave some around brads, along edges, and along score lines.  Looks tarnished now.


Add some red oxide paint in some random spots.  Now tarnished and rusted.


A lightening bug, the wings are printed on transparent paper, then I cut out and glued on the body of lightening bug.


Harlequin pattern on the background, because I love harlequin.  The wings are the chipboard with three layers so they have lots of dimension.


Monday, 10 September 2018

Purple Trees

I have about 3 projects on the go right at the moments, today I created a cover for my new class-
FAMILY, FAITH, and LAUGHTER.  This is a tribute album to my cousin Gina, she doesn't have much time left but instead of wallowing she is embracing her final moments.  Recently they planted a purple tree for a memento for her children when she is gone.  I have created a purple tree for the album cover- purple is her favorite color.

Tree was created with polymer clay, curly moss, paper and wire.  This is exactly what i saw in my mind, so happy it worked.


I started with snakes of polymer clay, that tapered smaller at the ends.  Then twist into a tree trunk, the seperate lengths of clay become the limbs.


The leaves were super painful to make, I cut the leaves with the silhouette then glued two together with a wire in the center.  Very time consuming.
Once the tree is shaped, insert wire leaves into limbs before it is baked.


The background paper was painted with umber acrylic paint, once dry add harlequin texture with modeling paster mixed with black paint.  Layered onto top is alchemy blue-gold paint, muted with a thin layer of umber again.  Then start adding waxes- white gold, amethyst and vintage gold.


I wanted the background of cover to look old and tarnished.  Layered underneath tree is curly moss, gives the tree that full bushy look.

Love how it turned out!
Stay tune for more, next I will make the album.

Thursday, 23 August 2018

Halloween in August

I am working on some new kits, and re-discovering my steampunk roots.  Here is my Halloween Creation
Mr and Mrs Bones


I cut a foam skull in half so I could make two canvases.  The hair is made with a foam support, cotton batting, and cheesecloth- my son thinks it is an old lady cap lol.  Next decorate.


For this one I cut out a circle section of skull to make an gear insert.  I really like working with foam, you can cut and shape into what you want plus it is sturdy and holds its shape.


I made the goggles with the bottom of a Medium Timmy's cup- cut, decorated, and painted.  BOOM goggles!


This eyepiece is made with cardstock, shaped into tubes, stacked together- decorated and painted.  Another BOOM!


I debated painting the whole skull black but i wanted color, I started with painting everything with gesso then a cream skull color.  Next paint the steampunk elements- goggles, gears, hair with Alchemy Metallic paints. Painting doesn't need to be perfect because once everything is dry I paint with watered down brown paint.  Now wipe off the extra paint.  The brown stays in the crevices, and antiques the decorations.  It's up to you how much brown you leave behind. 


The tubes are bendy straws, super really long bendy straws.  I got these from a friend and I have never found them again- I am now out.  DAMN


The scales around the hairline is made by heating the styrofoam just a little to much, once antiqued it leaves great texture.

I enjoyed making this, and it came together really quick.  Too bad instructions are that quick.

g


Monday, 23 July 2018

New Chippies

So summer has been busy- between camping, end of school, grad etc...  there hasn't been much time for scrapbooking.  When I finally sat down I worked on some new vinatge travel chipboard designs and then made them into page kits.
Layout 1 featuring a Shelby Mustang and a map of Canada.

Travel Canada Chipboard $9.75
Eleanor $ 6.50


Close up of the car.  The chipboard car consists of a base layer painted black, medium layer painted yellow with window details cut out, top layer painted yellow with car contour lines and grille.


Photo cluster.


Layout 2 featuring 62 ford and boler. The chipboard and sewing make everything look more shabby chic.

Boler $5.75
62 Ford $9.75


I paint the chipboard with distress paint, it covers really good but is nice and fluid.  Let dry then sand and ink with distress ink.  The ink settles into the sanded portion, defines the layers more and makes it look old and grungy.


I love sewing on a page, I had to pull out the machine for fixing coveralls so I thought why not.


Layout 3- i think this one is my favorite with the pastel colors it really looks like a 1950's scene.

Gas Pump $3.25
Top Down $10.75


More sewing, that's what happens when you pull out the sewing machine.


I like the grid layout, you can add photos in the squares and add on small embellishments.

Yes I know these are not all mix media like I usual do but I have been in a creative slump and it was really great to work on some simpler layout that don't require drying time.


Thursday, 14 June 2018

Wrap it up!

So this is the last month for Mixed Media Monthly Challenge Blog goodbyes are sad.
So this month's we are "Wrapping it up"
After a great run, it’s time to end this chapter of the Mixed Monthly Challenge. When I started this challenge four years ago in June 2014 I had no idea how popular it would become, how many people it would inspire or how many amazing artist and creative companies I would have the please of working with. I want to personally say thank you to all the awesome design team members (especially Lisa Hoel for keeping us going the last year), generous sponsors, talented guest designers and last but certainly not least the hundreds of mixed media artists who have played along with us through the years. Now it's time to move on. I wish you all well and I hope that you will play in the final Mixed Media Monthly Challenge this month as we “Wrap it Up.”

This month are sponsor is 
Sizzix Designer and crafter extraordinaire Eileen Hull 
We got these great wrap journal, blank white chipboard that we got to decorate her is mine.


These are super cute, there are holes along the spine that I put elastics in and use as a spine for 4 mini books inside.


I kept my decorating simple I am in a little bit of a creative slump.


Used paper called Oxidation- all look like rusty old metal.  Right up my alley.


Some inside booklets.


So long all!  Keep on crafting.