home

Thursday 26 October 2017

Geometric Travel Page 4

Another new page for you today, plus my color sisal finally arrived so I got to use it Whoo HOO
Start with 6"x10"  pattern paper for background, sponge on feather with Alchemy Fresh Orange and Emerald Green paint.


I used my new stencil Feathers and Stars


Around outside edge, paint with rust paste then just the turquoise from patina paste.  I like to use a baby wipe to smear the paste around and pull towards center of background paper.  Once dry rub vintage gold wax along edge.  Glue on die cut elements from 7 Dots Studios then outline with black charcoal, smear charcoal with fingertips.


Paint chipboard Time Travel with gold acrylic paint, sand and ink with espresso distress ink.  Color cheesecloth with lindy's magicals- rusty lantern line, shabby turbine teal and steampunk sepia.  Paint cheesecloth with sculpture medium, shape onto chipboard, the sculping medium holds the shape.  Layer on tags, and die cut elements.


Time Travel chipboard, a new design avaliable in my etsy store Boozybear


Finish layout with photo, die cut elements, title and SISAL!


Look at all that wonderful texture created with cheesecloth and sisal.

More texture with rust paste!  Plus love the shadowing you get from the charcoal smeared with fingertips.

I sprinkled on embossing powder among cheesecloth and chipboard then heat set from the bottom.  Layers lots and lots of layers is how i roll.

til next time....

Monday 23 October 2017

Journaling Pages

So my geometric journal has layout pages, journaling pages, and journaling cards.  Now i usually use cream cardstock as my base but i wanted to try black cardstock- I like it!
I made splatts with stencils and alchemy paint, these paints look FAB on black cardstock the sparkle really pops.  Add some die cut elements and doodling around with white charcoal pencil.  LOVE how the the white charcoal looks.


Frame photo with paper frames (a great way to use up scrap paper I don't think any paper went to waste with this album)  Around the photo and frame i painted on embossing liquid and embossed with stampendous embossing enamel.  Paint chipboard Looking Eye, sand and ink, I cut chipboard in half now I can use on another page.


Finally I added journaling- facts i took off the internet of places one hopefully i will visit.  I wrote with a white gel pen- really pops!


Another journaling page completed, this one i rubbed along the outside edge with gold alchemy wax.  Like the white charcoal and gel pen the vintage gold wax really pops against the black page.  I wish i had used the wax on the first page I think i will go back and add.  This chipboard piece is a paper bird design super fun.


Here is a journaling card to be added in between pages.  Again i used a chipboard paper bird.

Thursday 19 October 2017

Geometric travel Continued...

Next page, while not technically next page i don't make album in order... new page.  When I make an album especially for a kit I use the same mixed media products and techniques so my tutorial may start to get repeative- just a heads up.
Start with pattern paper 6"x10" this is Hazy Days paper from 7 Dots Studio.  Ink with stencil splats and distress ink, salty ocean and iced spruce.  Splatter with some water to watermarks.


I used splatter stencils available at BoozyBear etsy store
Splatter 10" x12"


More Splatter 10" x 12"


More MORE Splatter 10" x 12"


Next grunge up the edges, distress edges then paint around outside with rust paste, and turquoise patina paste.


Color cheesecloth with magicals- sepia and ponderosa pines olive, rip up and distress the heck out of cheesecloth.  Next paint with scrulpture medium- i squeeze on the medium then pounce into cheesecloth with an old paint brush, one that you don't care if it gets ruined.  Arrange cheesecloth under and over of chipboard geocaching.


Chipboard Geocaching- I think this is one of favorites chipboard designs. Paint with gold acrylic paint, dry, then sand and ink with ground espresso distress ink.  Wipe off excess ink, the ink with settle into the sanded portions and wipe off the painted areas.


Add die cut elements from Hazy Days paper pack, add charcoal outline around elements and smear with fingertips.
I love doing this on a page the key is to use a soft charcoal pencil that is sharp so you can get tight to the outside edge.


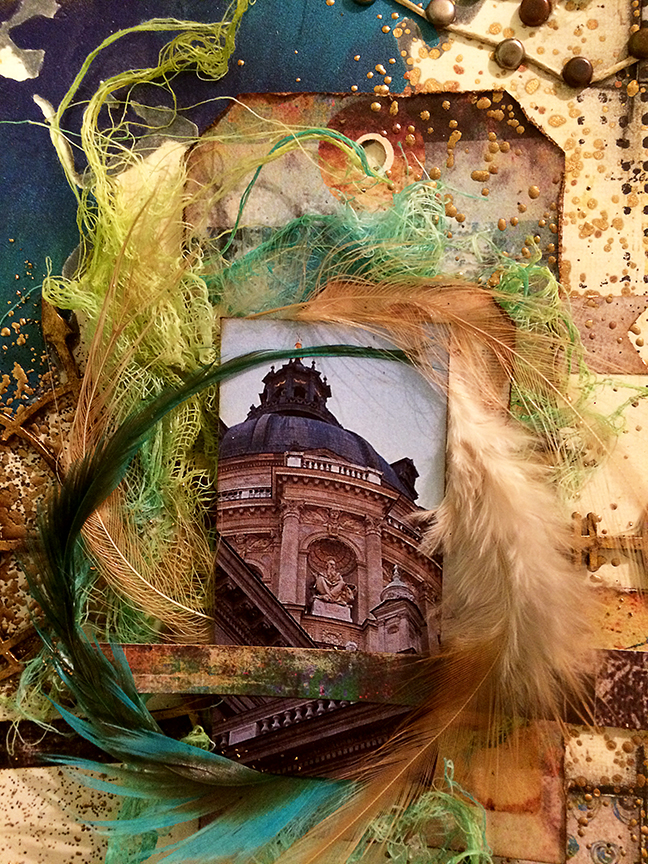
Finish with photo cluster and feathers, ta da finished.


Here you can see the grungy effect of chipboard and all those wonderful fibers from cheesecloth.
I like that the feathers aren't solid but wispy, its like it adds movement.


I like to always leave "white space" basically all the background paper isn't covered up it adds a definite focal point.

The pictures are of the Isle of Skye unfortunately I didn't actually go there this album is pictures of everything I want to see one day hopefully.


Monday 16 October 2017

Did you know...

Did you know i sponsor a challenge blog all about steampunk

Sandee & amelie's Steampunk Challenges
This was the first challenge blog I started entering my work into, because of course it is steampunk.  This blog is fantastic for ideas, and inspiration for any and all industrial, grungy, masculine and of course STEAMPUNK.


 I sent design team members this package of chipboard to see what could be created, so far two design team members have showcased their work on the blog.

First Design Team Member Kerstin created this, view the details here.

Next Maura created this steampunk ATC, view the details here.

Hop on over to SanDee & amelie's Steampunk Challenge for some inspiration.

Sunday 15 October 2017

Mixed Media Monthly Challenge

This month at Mixed Media Monthly Challenge is this color palette

Super Bright


Sponsored by Rubber Dance Stamps


I started with splattering tag with lindy's color spray.  I used Rubber Dance Stamp and ink with a combination of distress inks, before stamping i spray with water to re-activate ink.  Stamp onto tag- the water helps color blur and looks like water color.  I colored the details in the bird with black gel pen.


I cut out the contour of flowerdream chipboard out of tag, and fuzzy cut bird out.  Paint flowerdream chipboard with white paint and glue onto tag.  Next paint architecture clay molds with alchemy plum preserves paint, glue onto tag.  Paint with rust paste along edges and around architecture clay molds.


Rub on alcemy wax- it highlights all the lumps and bumps.  For the bird, i added see through dragonfly wings- next arrange flowers around wings to hide construction.  Glue bird back on to tag with pop dots.


TaDA the finished tag.


I think my favorite part are the art pebbles, on the back I painted with alchemy plum preserves they look like gems.


I made a dangly clock with chipboard clocks, painted white then rub with gold wax.  Add a white rub on to spectable and spinners to clock.


Really love how the birds with see through wings turned out very multi dimensional.


Until next time...


Wednesday 11 October 2017

Geometric Travel page 2

Finish a two page layout for my new album Geometric Travel.
I started with stencil Map of the World available at Boozybear etsy store and sponged with Alchemy paint- Midnight Sky, Emerald Green, Rich Turquoise, and Gold rush.

Next add a shadow with gray pencil crayon.

Paint around edges of layout with rust paste.


Color cheesecloth with Magicals- Rusty Lantern Lime, and Shabby Turbine Teal.  Rip up and shred.


Paint ellipse chipboard with gold paint, sand and ink with espresso distress ink.  The ink will settle into the sanded portion and wipe off paint.  Grungy final look.


Start layering together photo cluster, distress and ink edges of tag, layer ellipse chipboard over.  Paint cheesecloth with sculpture medium arrange around tag and chipboard.  Sculpture medium will hold shape once dry.


Add photos, tag and die cut elements from 7 Dots Studio Hazy Days paper pack.  Next the feathers I used glue, sculpture medium and patience to shape into a swirl around photo.


Next twine, twine is always fun.  I wanted it look like contour lines on a map, so i made cardstock pattern and added brads around edges then wrapped twine around brads.


Final layout


Around photo cluster i sprinkled on Stampendous embossing enamel then heat set from the bottom.  Add a little sparkle.


I added three random die cut squares around photo cluster then outline squares with charcoal.  I like to extend the lines pass die cut edges looks like architecture drawings.


Add some random texture stamping with archival black ink.

Until next time...